GDI Printer Support
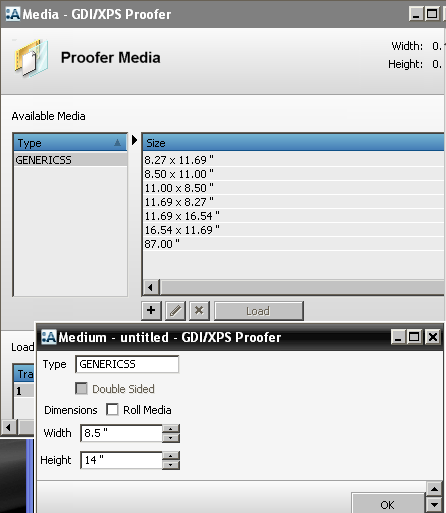
To set up your media resources you need to be logged in to the Prepress client as Administrator level or higher. Then do the following:- Go to System Overview and select the GDI TP.
- Double click the Media resource button.
- Fill in the appropriate information for the paper size you'll be using. Repeat for additional paper sizes as necessary.
- If you are going to be sending imposition proofs scaled to tabloid size, you should consider creating a landscaped media size, e.g., 17" x 11". You should make sure your Windows print spooler is configured to output landscape orientation.
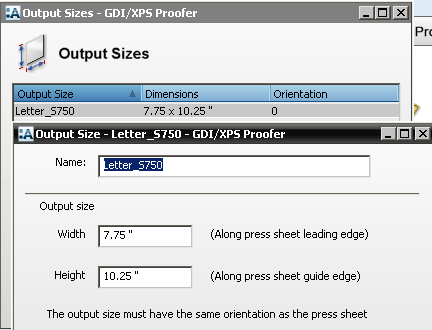
To set up output sizes, do the following:
- Go to the System Overview and select the GDI TP.
- Double click the Output Size resource category.
- Click the + sign to create a new size.
- Fill in a meaningful name, then supply the width and height from the test pages you created.
- Click Ok. Repeat the process for as many output sizes as you need.
If you want to place a border on your proof pages, you should create that now. You can use one of the system borders or make a new one.
Next, create the necessary parameter sets. You'll need one or more Image parameter sets and one Output parameter set per print spooler.
To Create your Image parameter sets, do the following:- Go to the System Overview and select the GDI TP.
- Double click the Parameter Set resource.
- Select the Image icon and click the + sign. Click the Image tab.
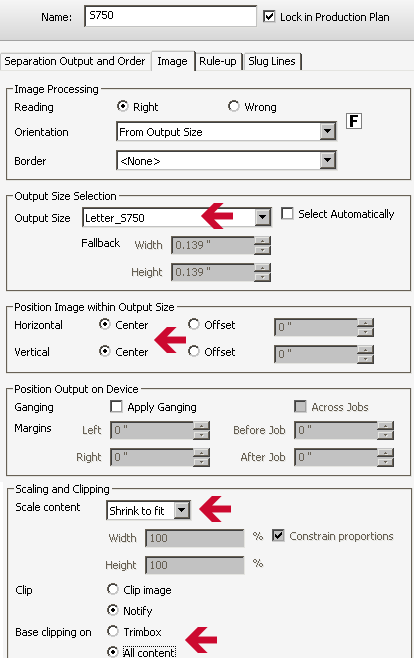
- Select the appropriate Output Size. You need to do this when the printer has margins. If the printer supports edge to edge printing and can be configured to automatically shrink to fit, you may use the "manual from input" selection.
- In the Position Image within Output Size section, select the "Center" radial button for both Horizontal and Vertical. This ensures Prepress will center the output within the selected Output Size.
- Under Scaling and Clipping, select "Shrink to fit." This will allow Prepress to symmetrically scale a page or flat to the chosen output size.
- If you are going to use a border on your proofs, you need to select "All content" for Base clipping. If you don't, when Prepress scales the job, your border could be cut off. By selecting all content, Prepress will take any border or rule ups into account when scaling the page/flat to be proofed.
- Choose any additional proofing features, such as rule ups, that are necessary and save the parameter set. Repeat for additional Image parameter sets as necessary.
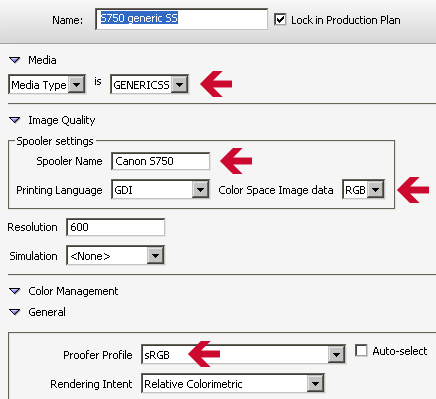
- Select the Output icon in the parameter set dialog.
- Click the + button.
- Supply a meaningful name. It should reflect the printer and the media used.
- Supply Media information. Choose Media if you want to specifically name a defined media size. Choose Media Type if you'll be using multiple media sizes in the printer. In the example above, we selected Media Type instead of Media because the printer supports different size paper. Prepress will prepare it for the media that is currently loaded (Media resource).
- In the Spooler Name field, you must type in the name of the Windows print spooler. DO NOT use the share name or network name. It must be the name of the spooler you created or Prepress will be unable to communicate with it.
- Select RGB for the Color Space Image data. GDI does not support CMYK.
- Select an appropriate RGB profile. You may use one of the default profiles for Prepress or you may supply your own.
- Supply any additional settings relevant to your printer and your workflow.
Use the GDI proofer in your plans just as you would any other proofer. In the example below, the proofer is branched from the run list, and a discard filter is used to selectively proof pages to the S750.

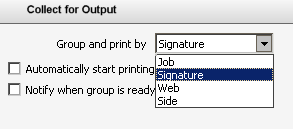
If you are using a dual sided proofer and you want to print two-sided, you need to place a Collect for Output in the proof flow and specify how printing should occur. In the example below, the proofer is used to print scaled down imposition proofs. Collect is set to Signature, enabling Prepress to print sig 1 front on the front of the proof and sig 1 back on the back of the proof.
Why Is This Important?
The ability to utilize GDI protocol for printing allows Prepress to connect to more printers. Whether it's a desktop color inkjet that can give you a quick view of your imposition or a high end color printer capable of generating quality page proofs, the GDI TP allows you to integrate a variety of printers not previously possible.When you connect to an HP proofer like a 1055 or 3500, you can use a better quality mode than by using the Agfa written driver. Specifically, you can use all the inks at better resolution.
Because GDI is a generic, industry standard protocol, you will be unable to use Agfa's QMS for calibration or generate dot for dot proofs. If you require these features, you'll need to use the Agfa drivers.
Finally, please see the section on QuickProof. This new feature is also part of the Hard Copy Proofing option. Once you've established GDI printers and parameter sets, you can use them with QuickProof!


 RSS
RSS
