

 RSS
RSSTips&Tricks
How to use the Problem Step Recorder tool in Windows
Introduction
Within Microsoft Windows an application, Problem Steps Recorder (PSR.exe), is implemented. This feature enables the collection of the actions performed by a user while encountering a crash or problem. The result might help testers and developers to understand and/or reproduce the situation for analysis and debugging. End result of the tool is a .zip file holding 1 document that has gathered all info regarding which actions have been done during recording.
Description
Sometimes customers get into a situation where a certain sequence of actions results in a software crash or some unwanted outcome. As service it is sometimes difficult to understand what the customer really did to get into that situation. Therefore it might be handy to have a tool that records all steps that have been done by the customer that cause the issue. So in some cases it would be good for Customer Service departments to get this recording, to have a better understanding of what was performed prior to the error. Please send this recording officially to your service department using the official channels being PowerHelp, ServiceExpress or FTP. This tool is available as a build-in application of some Windows platforms. The tool is called the Problem Step Recorder, shortly: PSR module.
Which platforms support PSR?
Not all Microsoft Windows platforms support this cool feature. These do; Clients: Windows 7, Windows 8, Windows 8.1 Servers: Windows Server 2008 R2, Windows Server 2012, Windows Server 2012 R2
How does it work?
Start the tool
- Start the tool by clicking on Start and typing PSR in the search field.
- Click on PSR in the results that you get. The tool will start giving you this small Window.

Operate the tool
- First get yourself into the situation where you almost encounter your problem. This to get a result that doesn't hold too much irrelevant data.
- Click on the Start Record button. From now on all steps you perform will be recorded. You can pause recording and resume later on if wanted.
- Click on Stop Record to stop recording of course.
- You'll get a Save As window, type a relevant name for the recording. And click Save. A '.zip' file will be saved.
To view the recorded result, simply open this .zip file and double-click on the file inside. The document will be opened giving you all recorded steps.
Extra's
Add comment during recording
- While you are recording it is possible to add comments.
- Click the Add Comment button during recording.
The screen will be grayed out and a window pop's up asking you to mark the part of the screen that you want to comment on. Do this, type in your comment and click OK to continue recording.
E-mail to recipient (see remark)
- We do not advise to use this option. Better is to send the recorded result to (Global) Services via official channels being PowerHelp, ServiceExpress or FTP.
This enables Customer Service to follow up on your issues in a structured manner.
Remark: This also will only be possible if you have an e-mail service installed on the computer.
Settings
- You can change some setting of the Problem Step Recorder.
Click on the dropdown arrow and select Settings, next window will open:
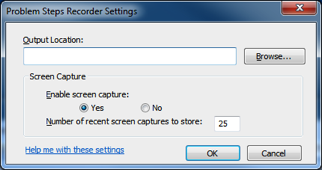
- Output Location: (default: empty)
If you don't want to be prompted to save a file after recording, click the Browse button to set a default output file name. - Enable screen capture: (default: yes)
Select No: If you don't want to capture the screen shots along with the click information.
This might be a consideration if you are taking screen shots of a program that contains personal information, such as bank statements, and you are sharing the screen shots with someone else. - Number of recent screen captures to store:
While the default is 25 screens, you can increase or decrease the number of screen shots.
Problem Steps Recorder only records the default number of screen shots. For example, if you took 30 screen shots during a recording but only had 25 screen shots as the default, you would be missing the first five screen shots. In this case, you would want to increase the number of default screenshots.

