Approving and Rejecting Pages
NOTE: Only for users with the Approver role for the job.
Pages which are ready to be inspected can be approved or rejected by users with the Approver role. The pages of a job can be inspected in the Flipbook once they have the Ready to Inspect status which is indicated with a blue icon.
Open and inspect a job

To open a job for inspection, do one of the following:
Click the link in the e-mail that you received notifying you that a job is ready to inspect. The WebApproval application opens in your browser and displays the job to be inspected.
OR
In the Jobs window, you can see if a job has pages to inspect by opening the information panel of a job. Click the job tile to open it.
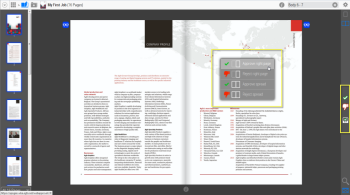
The Actions panel on the right is active and the Approve/Reject commands are displayed in the Actions menu.
Approve or reject pages (Actions panel buttons)
1 Go to the page or spread that you want to approve.
If the job is for a multi-part product, you can select a part in the Parts drop-down list in the top navigation panel.
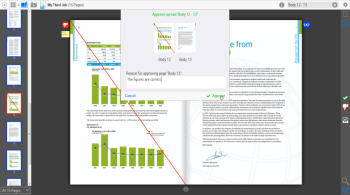
2 Click the Approve button.
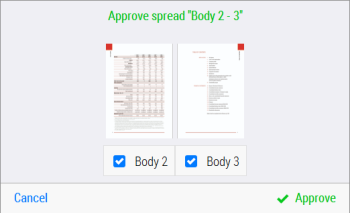
3 If you are in spread mode, select or clear the boxes for the right and the left page as required.
4 Click Approve to submit the page or spread.
The green Approve icon is displayed in the top corner of the page and the page thumbnail has a green border.
Approve or reject pages (Actions menu)
This is an alternative procedure for approving or rejecting pages.
1 Open the job and right-click a page to open the Actions menu.
2 Choose one of the options in the list to approve or reject the right or left page (depending on the current page) or the spread (both pages).
Approve all pages
On any page in the document, open the cogwheel menu and choose
Approve all remaining pages.
All pages with the Ready to Inspect status are approved. If you selected a part with the Parts drop-down list, only the remaining pages of the current part are approved. See
“Place files in multi-part jobs” for information on multi-part jobs.
Reject a page and create a remark
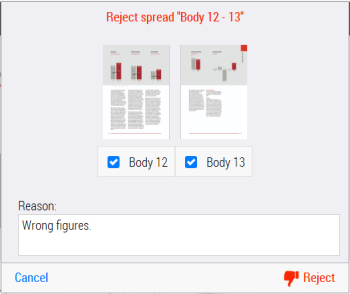
1 Go to the page or spread that you want to reject and click the Reject button.
2 If you are in spread mode, select or clear the boxes for the right and the left page as required.
You must enter a reason for rejecting the page or spread.
3 Click Reject to submit the rejection and the reason.
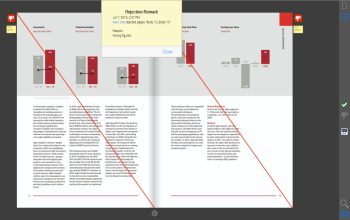
A red diagonal line across the page indicates that the page has been rejected.
A red Reject page status icon is displayed in the top corner of the page, together with a Remark icon, and the page thumbnail has a red border.
Other WebApproval users can open and read the remark by clicking the icon. The remark is also sent to the printer.
Approve a rejected page
1 Go to the rejected page or spread that you want to approve and click the Approve button.
You must enter a reason for approving the rejected page or spread.
Reject an approved page
Only the users of the Printer Company are able to cancel a page approval and reject a page which has already been approved by another user.
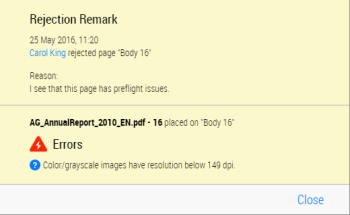
Review pages with preflight remarks
Placed files may have preflight issues which are flagged by the WebApproval system with a yellow preflight remark icon in the top corner of the filled pages in question. These remarks should be reviewed and the pages should be rejected and replaced if necessary.
Click a preflight remark icon to open the preflight remark that lists the issues for that selected page. Click the blue Help icon for more detailed information about the preflight issue.
NOTE: It is recommended to discuss preflight issues with the Printer Company to avoid unexpected results in the printed product.
If you reject the page, your rejection remark is added to the preflight remark.
Approve/reject versions
NOTE: Feature only available in WebApproval Pro.
WebApproval allows you to approve/reject different versions of the same print product in a single job. These versioning jobs have content which is shared for all versions (e.g. images) and content that is specific for each version (e.g. text).
Base version
The base version of a versioning job is generally the first version (v1) although any version can be set as the base version by the Printer Company. When you preview the base version, you can approve or reject the shared and the version-specific content together. The approve/reject actions are enabled for all the pages.
Pages with version-specific content
If the pages in the other version have version-specific content, you can approve or reject the version-specific content on these pages but not the shared content (e.g. different language versions). The approve/reject actions are enabled for all these pages. If such a page has been rejected in the base version or one of the other versions, it will have the Ready to Inspect status and a dashed grey diagonal line to indicate that you can still approve/reject the version-specific content.
Pages with no version-specific content
If the product of a versioning job has pages with no version-specific content (e.g. address change on the last page only), you can only approve/reject these pages in the base version. The approve/reject actions are disabled for these pages in the other versions and the pages have a solid grey diagonal line if they have been rejected.
Color code for rejected pages in versions
| Solid red diagonal line. The page has been rejected in the current version. |
| Solid grey diagonal line. The page has been rejected in another version but has no version-specific content. You cannot approve or reject this page in the current version. |
| Dashed grey diagonal line. The page has been rejected in another version but has version-specific content. You can approve or reject the page in the current version. |
NOTE: The files for a versioning job can be uploaded by the Print Buyer but only the Printer Company can place the uploaded files.
How to approve/reject versions
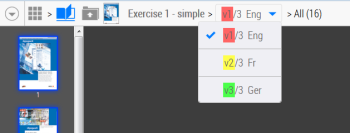
1 In the top navigation panel of the Flipbook, click the Versions drop-down list to display a list of the versions for your job. The Versions drop-down list is only available for versioning jobs.
2 Select the version you want to approve or reject.
The pages you now see in the Flipbook are for the selected version.
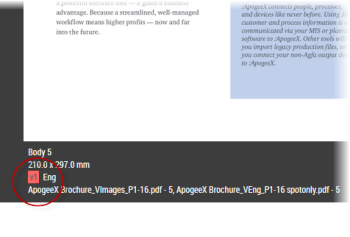
3 On the cogwheel menu, choose Show Page Info to display the version ID and the name of the files used to create the version, under each page.
If you are reviewing the base version, you can approve/reject the shared content and the version-specific content together for all the pages. In the other versions, you can only approve/reject pages with version-specific content, as explained above.